Saturday, May 28, 2016

Save The Fingers Microwave Finger Gloves

Being a crocheter, I value my fingertips a whole lot.  That being said, I also use my microwave often, and I now mostly use glass to cook in.  After many times getting frustrated about using large hot pads, and way-to-large oven gloves to retrieve my hot bowl of rice and peas, I decided that I would make something small enough to handle smaller dishes but would also protect my delicate fingers.  Enter the "save the fingers microwave finger gloves"!  Easy to make and quite practical for small plates and bowls fresh out of the microwave.  Plus they're quite a conversation piece because someone will undoubtedly say "what the heck are those?" when they see them hanging on your hooks by the oven.


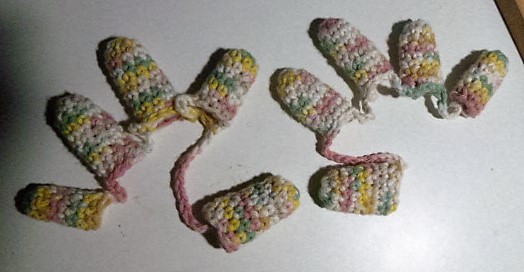
Here's how to make them

1. Start with a magic circle, and sc 8. Or chain 2, sc 8 in 1st ch. do not join.

2. Working in the round, sc in each sc for 9 or 10 rounds. You can mark the first stitch of each round, but it's easier if you just crochet until you reach the length of your middle knuckle. Finish off and weave in ends.

TIP after your second round use your finger to push out the forming tube and it will be easier to find the stitches.

3. Repeat Steps 1 and and 2 for each finger. For the thumb, sc 9 as a base because the thumb is wider. Fit should be tight as the cotton will stretch with use.

4.  After you finish the thumb, do not finish off. Ch 12 and join to next “finger” with slst. Slst in next 3 sts, ch 5 and join to next finger with slst. Repeat for next 3 “fingers”. Tip the reason for the 3 slsts in next finger is to center the chains between the “fingers”.
After last finger, finish off and weave in ends.

 They look crazy, right?! But they do help to prevent the burn from a hot dish!
And you won't risk damaging your valuable assets!
Written pattern is available in my Ravelry store HERE.

Friday, May 27, 2016

My helmet bag

I finally got a motorcycle!  Yay!  Now, once you have the motorcycle the next  step will be acquiring things for the motorcycle, or for myself and the motorcycle.  First thing was I needed a bag for my helmet, and gloves.  The helmet is great, but I didn't like the chintzy bag that came with it.  So I made my own helmet bag.  What to make next.....maybe a jacket and chaps?  Well, I better stick to leather and not yarn for that.

Wednesday, May 18, 2016

Groovy Flower Power Barefoot Sandals

This is a photo tuturial for my Groovy Flower Power Barefoot Sandals.  Starting off is a quick and basic pattern for the barefoot sandal.  Then a pattern for a retro flower you can sew on.  Once you have the basic pattern down, you can always add your own embellishments!  For the written pattern without pesky pictures, it's available for free on my Ravelry store HERE.

Basic Barefoot Sandal
Start by chaining  for approx 26” (about 100 chs) with color A.  (This will be one ankle tie)
30 sc in ch for toe loop

Put a stitch marker on last chain made, then chain 30 and sc into chain with marker and sc in the next.  (this is the toe loop)

Chain for another 26” and finish off.  (This is a very basic barefoot sandal)
Keep in mind you can add or delete chains to fit larger or smaller feet.  Size shown will fit most adults.


toe loop

basic barefoot sandal


Flower Power Pattern
Rnd 1  Sc 6 into magic ring. Leave a long tail for sewing.  Finish off.  (I suggest you pull yarn through instead of knotting.  You can work around your ends in next round.  You can also ch 2, sc 12 in first ch, but your center hole will be larger.  I highly recommend a magic ring.)


Rnd 2  Attach second color to any sc with slst.  Ch 1, sc in same stitch. (I attached it to the first sc made in last round making sure to catch the ends in the sc and pulling to tighten.)  
*Slst into next sc, ch 5, working back down chain, sc in 2nd ch from hook and in next 3 chs, slst in same sc, sc in next st*  
Repeat from * to * 6 times, omitting last sc and slst to 1st sc in round.  You should have 6 petals with a sc between each one.
ch 5, sc in 4, slst to same sc


Rnd 3  *Working up edge next petal, sc, hdc, dc, 2 dc. Working around to opposite side of stitches, 2 dc, dc, hdc, sc, slst in sc between petals.*
Repeat from * to * 6 times.  (If you are having trouble finding the stitches to work in to, Pull at them until you can see them.  You are working up the back of the scs from last round and then around the front.  There are, therefore, 4 stitches on each side to work in to.)    
sc, hdc, dc, 2 dc

back around, 2dc, dc, hdc, sc, slst into sc between petals

2nd petal done


Finish off and sew flower onto sc on basic barefoot sandal.  Add beads to ties if desired!

Go Forth and Be Hippy!


Friday, May 6, 2016

Healing Through Creativity : Stigma and Mental Health

Healing Through Creativity : Stigma and Mental Health: Stigma is harsh, isolating, and a major issue in mental health. Those living with a diagnosis experience stigma and anyone who works in b...