Wednesday, April 19, 2017

My Comfy Crochet Shoes

Having a history of foot problems, there are days when I can't even bear putting on a pair of shoes.  So I scoured the internet for some ideas and came up with my Comfy Grape Slippers.  I used a basic pattern from Make and Do and went from there.

Since this was the first time I had ever tried to make shoes from flip-flops (or thongs, as I used to call them) I purchased a cheap pair from the Dollar Store and used worsted weight cotton from AC Moore (from the milled ends bin).

They turned out pretty well and are quite comfortable!  I did not follow the pattern exactly because I wanted something that would fit my toes loosely.  When I do make another pair I would advise getting the soles from Old Navy or someplace similar because the soles are a little more sturdy than the $ Stores.
All said and done I love them!

 Oh, by the way, the socks came from the Dollar Store as well!


Keep Calm and Keep Crocheting! 😸

Friday, March 17, 2017

Kitty Paws Scarf


Being a cat lover, as soon as I saw this pattern I had to make a few!  So cute and original!  

If you are interested in making it, here is the link Meandering Paw Prints.  It's a free pattern and very easy to make!  I made mine a bit longer so they look like super scarfs.  Long or short, cat people, as well as kids will love it!  If interested in purchasing one, message me with color choice and size and I will make it for you for $25.  Thanks for checking it out!

Tuesday, January 31, 2017

Granny Super Scarf

Haven't blogged for a bit, so I think it's time to catch up!

It was a Super Scarf Christmas this year!
This one I made for my youngest sister,  It's a pattern I made from a picture from Moda Operandi and the designer Rosetta Getty.
Mixed Media Granny Scarf

I don't have a pattern for it, but it was pretty easy to figure out if you know how to make various granny squares.  Of course, Rosetta Getty's sold for $1000, but mine was made with RHSS, so not so expensive.


This one I made for my daughter-in-law.


And this one was for my other sister who is all about "purple power".


And here is an "artsy" picture my youngest sister sent me adorning one of her trees.


These were really fun to make, not really difficult, and sure get attention!

Friday, September 23, 2016

Color Pooling

There has been a craze (or maybe obsession) lately in the crochet community about "color pooling".  It's about taking a variegated yarn and crocheting it into a discernible pattern.  The ideal being the argyle pattern.  I must admit I fell into the pool (ha ha) myself.  I was so fascinated by it I went on a quest to figure it out on my own.

With so many variegated yarns available, it was tough to find just the right one to "pool" correctly.  In this example I used Red Heart Super Saver in Zebra.  I started with a chain of 42, then used the moss stitch starting in the 4th chain from the hook and 2 chains to turn.  I used an I hook, but there are some who got the same results using a different hook and count.

My results were stunning, but since everyone has a different tension when crocheting, results will vary from person to person.  If I can find more RH Zebra, I see an awesome super scarf in my future!


Wednesday, September 7, 2016

Mermaid Tails and Other Cozy Things

Finally, summer is coming to a close and that means making warm and cozy things!

Got a few projects started and the first one is the unbelievably popular Mermaid Tail.  Although this is often geared towards the girls in our family, I believe boys like them too!  This one is UNISEX so all the kids can get cozy!  This one is now available in my Etsy Shop HERE.


Tuesday, June 21, 2016

My Prairie Star


I wanted to share this afghan I made as a wedding gift for my son and daughter-in-law last year.  I was cleaning up (yeah, that doesn't happen much) and found some of the charts I made, so I figured I would share.

I started by searching for an afghan that looked like a quilt, and I chose this pattern from Red Heart called Prairie Star Afghan as a starting point.  I started with a diagram for the pattern and filled it in with my chosen color scheme (my daughter-in-law loves purple and my son loves green).  I think the colors worked out well!

  Anyway I started with the diagram below.  Then I filled it in with colored pencils.  As the chart filled, I added my own increases to make it queen size.  I was shooting for measurements of 66 x 84 and it turned out to be a little bigger.

I filled in most of the chart before I started, but when the measurements needed to be much bigger than the original pattern, I charted as I went.
my chart filling up
 My chart almost done!
The finished product!  I was definitely a labor of love!


You can find the pattern and diagram for the Prairie Star Afghan HERE.  There is also an excellent YouTube tutorial for this pattern HERE


Friday, June 10, 2016

Circle Jacket

Recently finished a circle jacket and I am thrilled with it!  I used a free pattern from Drops Design called Moonlight Mist.  To make it fit a 5-7 year old, I used dk(3) yarn and a J 5.5mm hook.  You can pretty much size this to anyone by changing yarn weight or hooks.  The armhole placement really determines the size however!

 You can find the free pattern HERE

Saturday, May 28, 2016

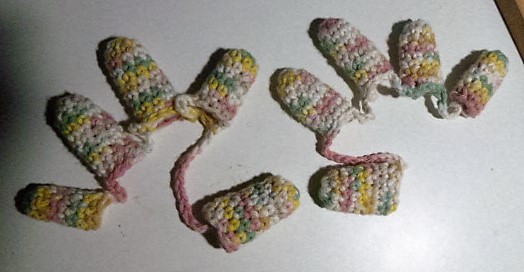
Save The Fingers Microwave Finger Gloves

Being a crocheter, I value my fingertips a whole lot.  That being said, I also use my microwave often, and I now mostly use glass to cook in.  After many times getting frustrated about using large hot pads, and way-to-large oven gloves to retrieve my hot bowl of rice and peas, I decided that I would make something small enough to handle smaller dishes but would also protect my delicate fingers.  Enter the "save the fingers microwave finger gloves"!  Easy to make and quite practical for small plates and bowls fresh out of the microwave.  Plus they're quite a conversation piece because someone will undoubtedly say "what the heck are those?" when they see them hanging on your hooks by the oven.


Here's how to make them

1. Start with a magic circle, and sc 8. Or chain 2, sc 8 in 1st ch. do not join.

2. Working in the round, sc in each sc for 9 or 10 rounds. You can mark the first stitch of each round, but it's easier if you just crochet until you reach the length of your middle knuckle. Finish off and weave in ends.

TIP after your second round use your finger to push out the forming tube and it will be easier to find the stitches.

3. Repeat Steps 1 and and 2 for each finger. For the thumb, sc 9 as a base because the thumb is wider. Fit should be tight as the cotton will stretch with use.

4.  After you finish the thumb, do not finish off. Ch 12 and join to next “finger” with slst. Slst in next 3 sts, ch 5 and join to next finger with slst. Repeat for next 3 “fingers”. Tip the reason for the 3 slsts in next finger is to center the chains between the “fingers”.
After last finger, finish off and weave in ends.

 They look crazy, right?! But they do help to prevent the burn from a hot dish!
And you won't risk damaging your valuable assets!
Written pattern is available in my Ravelry store HERE.

Friday, May 27, 2016

My helmet bag

I finally got a motorcycle!  Yay!  Now, once you have the motorcycle the next  step will be acquiring things for the motorcycle, or for myself and the motorcycle.  First thing was I needed a bag for my helmet, and gloves.  The helmet is great, but I didn't like the chintzy bag that came with it.  So I made my own helmet bag.  What to make next.....maybe a jacket and chaps?  Well, I better stick to leather and not yarn for that.

Wednesday, May 18, 2016

Groovy Flower Power Barefoot Sandals

This is a photo tuturial for my Groovy Flower Power Barefoot Sandals.  Starting off is a quick and basic pattern for the barefoot sandal.  Then a pattern for a retro flower you can sew on.  Once you have the basic pattern down, you can always add your own embellishments!  For the written pattern without pesky pictures, it's available for free on my Ravelry store HERE.

Basic Barefoot Sandal
Start by chaining  for approx 26” (about 100 chs) with color A.  (This will be one ankle tie)
30 sc in ch for toe loop

Put a stitch marker on last chain made, then chain 30 and sc into chain with marker and sc in the next.  (this is the toe loop)

Chain for another 26” and finish off.  (This is a very basic barefoot sandal)
Keep in mind you can add or delete chains to fit larger or smaller feet.  Size shown will fit most adults.


toe loop

basic barefoot sandal


Flower Power Pattern
Rnd 1  Sc 6 into magic ring. Leave a long tail for sewing.  Finish off.  (I suggest you pull yarn through instead of knotting.  You can work around your ends in next round.  You can also ch 2, sc 12 in first ch, but your center hole will be larger.  I highly recommend a magic ring.)


Rnd 2  Attach second color to any sc with slst.  Ch 1, sc in same stitch. (I attached it to the first sc made in last round making sure to catch the ends in the sc and pulling to tighten.)  
*Slst into next sc, ch 5, working back down chain, sc in 2nd ch from hook and in next 3 chs, slst in same sc, sc in next st*  
Repeat from * to * 6 times, omitting last sc and slst to 1st sc in round.  You should have 6 petals with a sc between each one.
ch 5, sc in 4, slst to same sc


Rnd 3  *Working up edge next petal, sc, hdc, dc, 2 dc. Working around to opposite side of stitches, 2 dc, dc, hdc, sc, slst in sc between petals.*
Repeat from * to * 6 times.  (If you are having trouble finding the stitches to work in to, Pull at them until you can see them.  You are working up the back of the scs from last round and then around the front.  There are, therefore, 4 stitches on each side to work in to.)    
sc, hdc, dc, 2 dc

back around, 2dc, dc, hdc, sc, slst into sc between petals

2nd petal done


Finish off and sew flower onto sc on basic barefoot sandal.  Add beads to ties if desired!

Go Forth and Be Hippy!